Once you’ve identified the assets you want to manage, you can create a work order to assign inspection or maintenance tasks to a mobile worker. You can review and track existing work orders from assignment through completion.
Creating a Work Order
- Open the Facility Inspection widget

- Select an ambit. For more information, see Calculating Asset Status

- Select a Structure Parameters

- For an inspection work order, calculate structures using the All Structures-(Default) parameters
- For a maintenance work order, calculate structures using the Maintenance parameters, which will only return results for structures that have an inspection status other than Good
- For more information on calculating structures, see Defining Structure Parameters
- Calculate structures in an ambit

- Click the Create Work Order button at the bottom of the structure results table

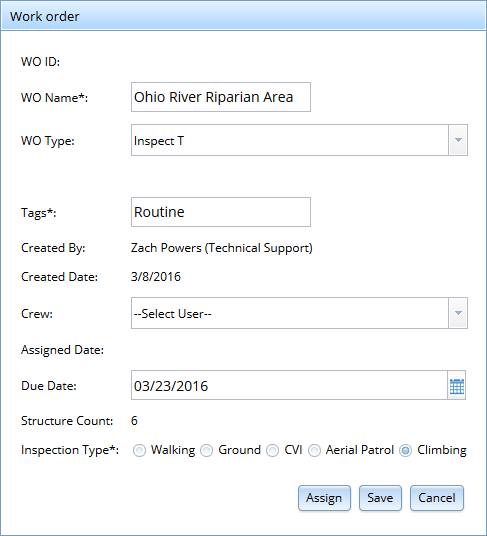
- In the Work Order window:
- Enter a name for your new work order in the WO Name box.
- Select an assignment type from the WO Type drop-down menu - select Inspect T for a transmission inspection work order or Maintenance T for a transmission maintenance work order.
- Enter at least one tag in the Tags box. Separate tags with commas.
- Select the user who will receive the assignment from the Crew drop-down menu, or leave the default menu option in place if you’d like to assign a user later.
- If desired, enter a due date in the Due Date box or click the calendar icon to select a due date from the calendar.
- Select an inspection type from the Inspection Type menu.
- Click Assign to save the work order and assign it to the user you selected earlier.
- If you did not assign a user, click Save to create the work order without assigning a crew. For more information on assigning saved work orders, see Updating, Assigning, or Deleting a Saved Work Order below.
Tracking Work Orders
Work order status updates in real time as mobile users take action on the assignment. The status updates when a user saves the work order (Saved), when a user assigns the work order to a crew (Assigned), when the assigned user opens and syncs data for the work order (In-Progress), and when the assigned user syncs data for all structures included in the work order (Complete).
- Open the Facility Inspection widget
- Click on the WO Library tab.
 All your current work orders will display in the work orders table.
 - Click any column header in the work order table to sort the table.

- Click the Filter button to filter the work orders displayed in the table.
- Choose an option from the Select Filter Column drop-down menu to determine how you'll filter the results.
- Choose an option from the operator drop-down menu to determine whether you'll filter for results equal to, not equal to, or like your search term.
- Select a search term from the drop-down menu or type a value in the search term box.
- Click Apply Filter to filter the work orders table.
- Click Filter then click Clear Filter to remove your current filter and display all work order results.

- Click any work order in the table to zoom to its location in the map and highlight its ambit boundaries.
- Click Open to review the assigned details for the highlighted work order.
Updating, Assigning, or Deleting a Saved Work Order
- Users can update, assign, or delete work orders with the Saved status.
- Click any work order with Saved status in the WO Library table to highlight it
- Click Open to view the work order details.
- Modify any details you want to change
- Click Update to save the work order.
- Select a user from the Crew drop-down menu
- Click Assign to assign the work order to a mobile device user.
- Click any work order with Saved or Assigned status in the WO Library table to highlight it
- Click Delete to delete the work order.
0 Comments